Carrot ETL Guide

Welcome to the Carrot’s Data Engineering Procedure for OMOP representation.

The Carrot’s Data Engineering Process for OMOP standard vocabulary process primarily consist of Data Pre-processing, Metadata Profiling and Metadata Mapping.

The following document sets the Standardised Operating Procedure (SOP) that must be followed and applied during the engineering of data for conversion to an OMOP representation.

Figure 1 illustrates the 3 main data engineering stages and the associated software tools that are used, this process is commonly known as an Extract, Transform and Load (ETL) process.

⚠️

This document only covers the ‘Extract and Transform’ sections of an ETL process as per the Figure below.

ETL Process Diagram

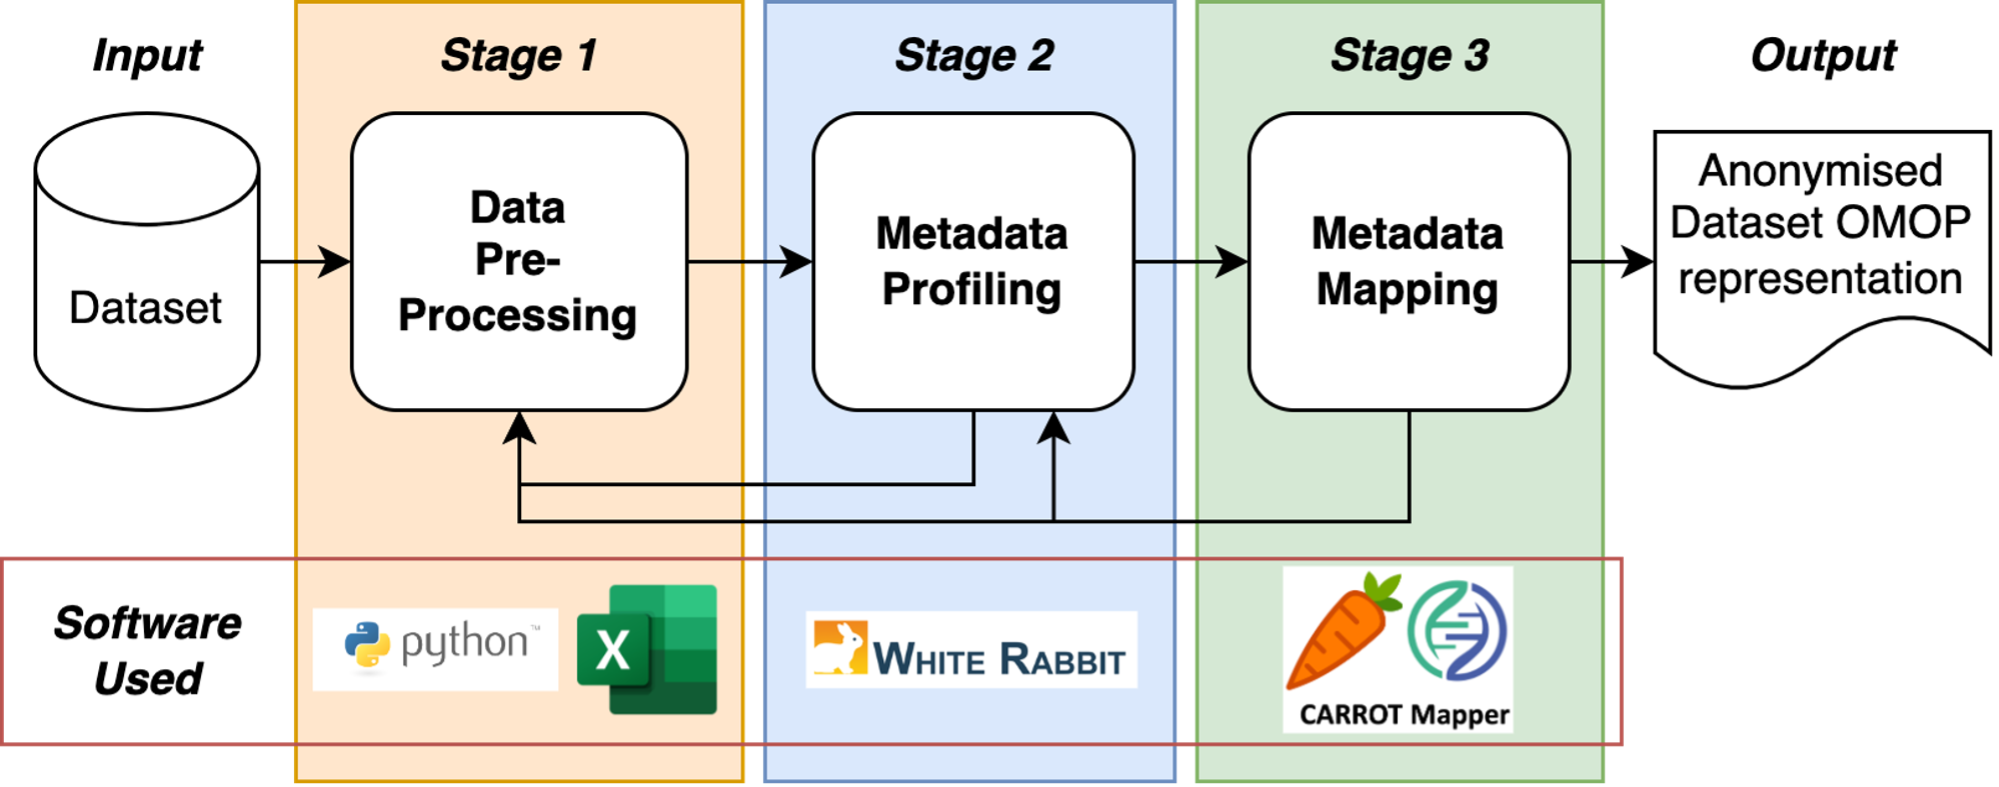
Figure 1: The stages of Health Informatics Data Engineering.

Data Engineering Overview

Figure 2 portrays the high-level view of the 3 stages and the main processes they are comprised of:

  • Stage 1: Data Pre-processing

The pre-processing stage focuses on the ‘important attributes’ of a dataset that need to be mapped to the OMOP Common Data Model for discoverability.

A meeting with the dataset owner is necessary to understand the context and select the key data attributes to be made discoverable. From this a subset of the data is then anonymised by the data owner and refactored (reorganised), producing a pre-processed dataset. This is then reviewed by the data owner to determine if it is fit for purpose and is fully anonymised.

The output of Stage 1 is an anonymised dataset ready for profiling together with a formatted data dictionary.

  • Stage 2: Metadata Profiling

The metadata profiling stage assesses the structure of a pre-processed dataset.

The pre-processed dataset is loaded into the OHDSI White Rabbit tool, this produces a statsitical profile of the data called a ‘Scan Report’ that further de-identifies data by removing the relationships between data attributes. This is then checked to ensure that the data has been rigorously anonymised.

The output of Stage 2 is a Verified Scan Report spreadsheet.

  • Stage 3: Metadata Mapping

The metadata mapping stage takes the dataset attributes and maps them to OHDSI OMOP Common Data Model for discoverability.

Individual dataset attributes are mapped to ‘Standard’ OMOP terms (e.g., these could be from SNOMED CT, RxNORM or LOINC controlled international standardised healthcare vocabularies), this process creates rules. The resultant rule set is then reviewed for correctness and completeness.

The output of Stage 3 is a mapped rule set in a JSON

Data Engineering Overview

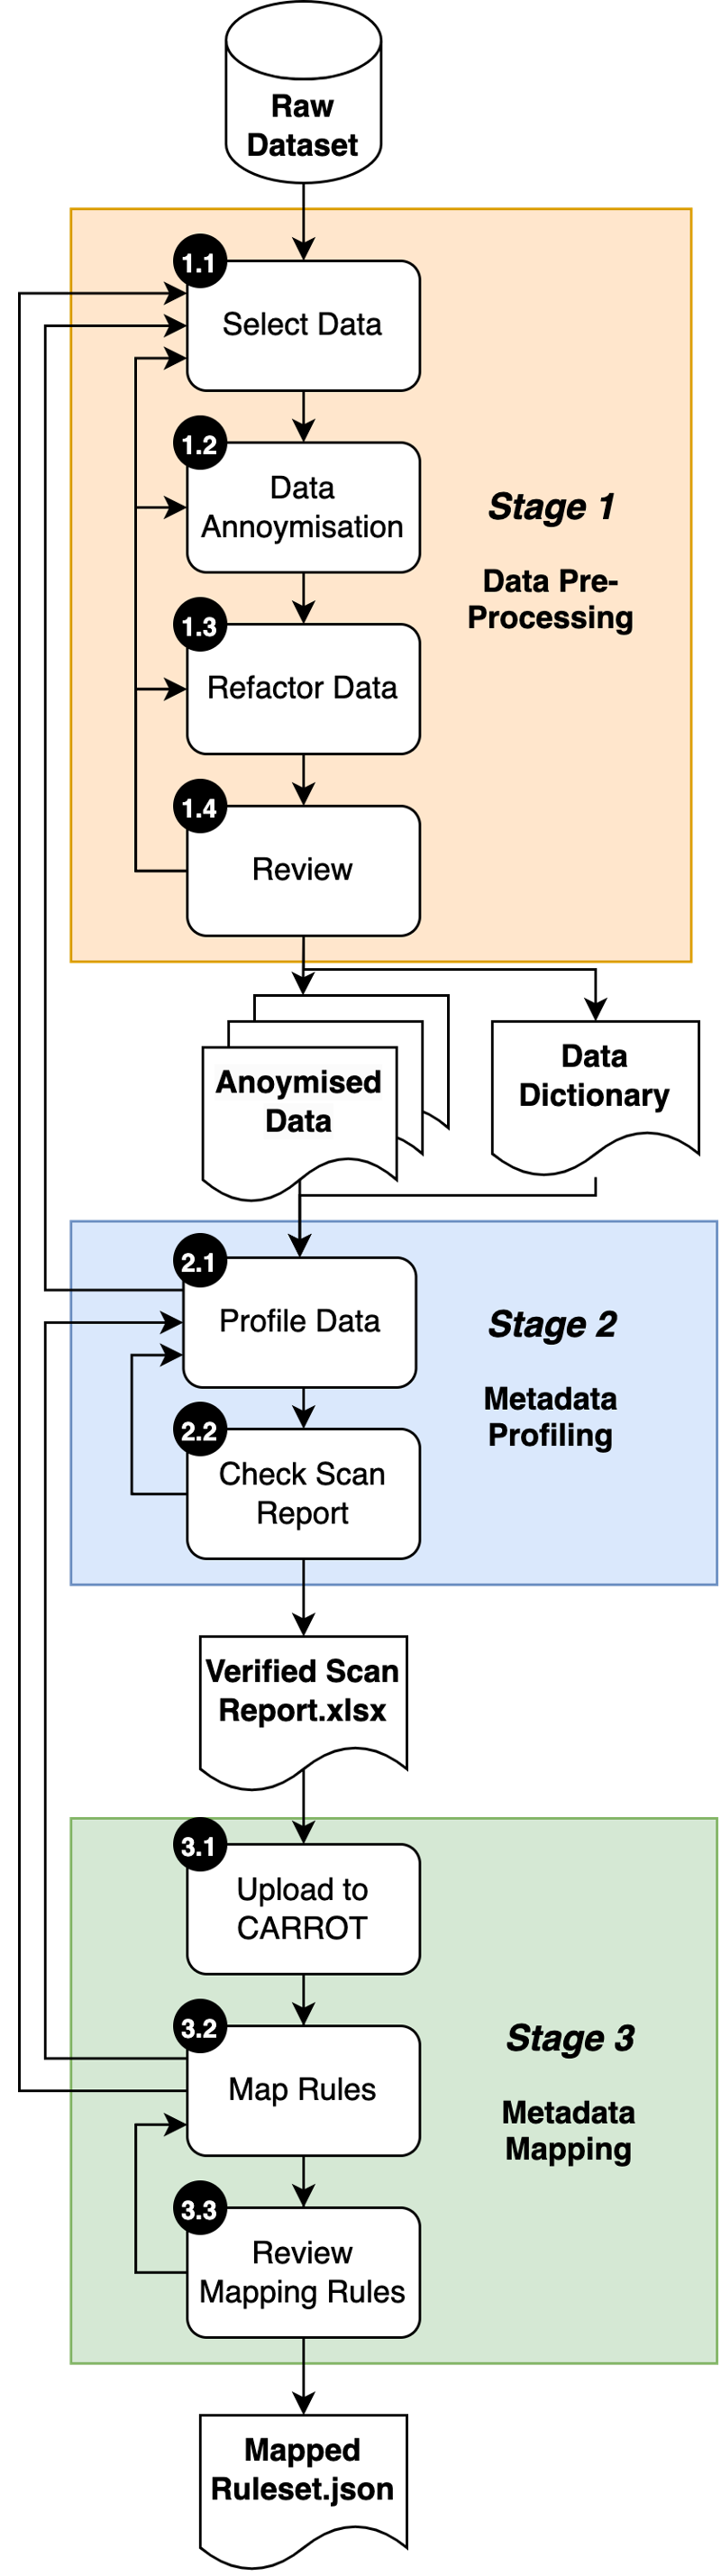
Figure 2: Data Engineering Overview

Stage 1: Data Pre-processing

Select Data

It is necessary to understand the context of each dataset to allow a representative conversion to be performed.

  1. Meet with Data Owner
  • Discuss their dataset(s) and specific requirements.
  • Understand what each dataset represents (so you understand their context and perspectives).
  • Explain the data engineering process (so they understand your perspective and what Health Informatics can offer).
  1. Choose Data Set(s)
  • Discuss with the data owner which dataset(s) they would like converted.
  1. Select data and conversion goals:
  • The aim is ‘Data Discoverability’.
  • Define conversion goals, i.e., what is to be converted for discoverability.
  • Select data attributes to be converted – not all data attributes are necessary for discoverability, a minimal set of data attributes may just be necessary.
  1. Define Working processes
  • Understand where each dataset is located.

  • Understand what the security arrangements are.

  • Understand access rights to the dataset.

  • Define communication and feedback mechanisms and frequency thereof – these can be emails, weekly meetings, etc.

Selecting Data during Data Pre-processing

Figure 3: Selecting Data during Data Pre-processing

Data Anonymisation

The anonymisation of data is paramount, it is critical that the following steps are carefully followed.

⚠️

It is the responsibility of the Data Owner to de-identify datasets before they are supplied for OMOP conversion.

  1. Define Data Anonymisation
  • Identify the Personally identifiable information (PII) / Personal Data: data attributes (see PII definition and description).
  • Locate and highlight the Direct-Identifier data.
  • Locate and highlight the Pseudo-Identifier data.
  • Discuss with Data Owner which Pseudo-Identifier data should be removed (see PII definition and description) – Date of Birth must be removed!
  1. Anonymise dataset
  • It is the responsibility of the Data Owner to de-identify datasets!

  • Direct identifier data ‘must be removed’ from each dataset – remove the row data from the columns, do not delete the columns.

  • Remove agreed Pseudo-Identifier data – again, remove the row data, do not delete the columns.

    • Date of Birth must be removed!
Data Anonymisation during data pre-processing

Figure 4: Data Anonymisation during Data Pre-processing

Personally Identifiable Information (PII) / Personal Data

This means any informaton relating to an identified or identifiable natural person (data subject); an identifiable natural person is one who can be identified, directly or indirectly, in particular by reference to an identifier such as a name, an identification number, location data, an online identifier or to one or more factors specific to the physical, physiological, genetic, mental, economic, cultural or social identity of that natural person Information Commissioner’s Office.

Example of Direct and Indirect Identifiers

Figure 5: Example of Direct and Indirect Identifiers

PII refers to data that can be used to identify, locate, or contact individuals or establishments, or reveal the characteristics or other details about them. PII might consist of direct identifiers, such as the name, social security number or other information that is unique to an individual. Indirect identifiers include uncommon race, ethnicity, extreme age, unusual occupation and other details CDC.

Direct Identifiers

  • ‘Direct identifiers are variables that point explicitly to particular individuals or units’ University of Tennessee.

  • ‘Information that explicitly identifies a person’ Devaux.

Direct identifier data must be removed from datasets, as follows:

Example of Direct Identifiers

Figure 6: Example of Removing Direct Identifiers.

Indirect / Quasi-Identifiers

  • ‘A quasi-identifier (also called a semi-key) is a subset of attributes which uniquely identifies most entities in the real world or tuples in a table’ Motwani and Xu, 2007.

  • ‘Information that can be combined with additional data to identify a person’ Devaux, 2020.

The majority of quasi-identifier data must be removed, as follows:

Example of Removing Indirect Identifiers

Figure 7: Example of Removing Indirect Identifiers.

Refactor Data

The anonymisation of data is paramount, it is critical that the following steps are carefully followed.

⚠️

It is the responsibility of the Data Owner to de-identify datasets before they are supplied for OMOP conversion.

  1. Organise Data Tables
  • Create a demographics table, consisting of:
    • Identifier
    • Date of Birth
    • Sex at Birth
    • Ethnicity
  • The rest of the data can then be arranged as deemed fit by the data owner and / or the data team, each table must include:
    • 1 x identifying column per table.
    • 1 x date event per table.
  1. Create Dataset Extract
  • First, check the CARROT4OMOP Data Standards page for exact requirements.

  • Extract the data from the data source – this can be done in 2 ways:

    • export tables to CSV files (1 per table);
    • create a view within the database.
  • Prepare a data dictionary for mapping.

Refactoring the data in data preprocessing section

Figure 8: Refactoring the Data in Data Preprocessing.

Review

It is essential that all data extracts are reviewed prior to Stage 2.

  1. Review Dataset Extract
  • Check the agreed data attributes chosen in Stage 1 are selected.

  • Check that the dataset has been anonymised as per Stage 2.

  • Check the demographics table exists and contains these 4 data attributes:

    • Identifier
    • Date of Birth
    • Sex
    • Ethnicity
  • Check that there is a date event to map to per dataset table and that it conforms to CARROT4OMOP.

  • Check that there is a date event to map to per dataset table.

  • CHECK WHETHER THE DATA DICTIONARY FOLLOWS OMOP DATA STANDARDS.
Reviewing in data preprocessing section

Figure 9: Reviewing in Data Preprocessing.

Stage 2: Metadata Profiling

The understand a dataset’s metadata the WhiteRabbit statistical profiling tool from OHDSI is used. This tool has been vetted by UoN Information Security and Compliance team and passed the UoN DPIA process.

A full User Guide and Introduction to WhiteRabbit is here:

Profile Data

1. Setup WhiteRabbit

  • Open the WhiteRabbit tool.

Metadata extraction for csv files:

  • Locations screen:
    • Enter ‘Working Folder’ location (see image below).
    • Click ‘Test Connection’ to ensure that it is working.
    • Then go to the ‘Scan’ tab Screen.
Profiling data in metadata profiling section

Figure 10: Profiling Data in Metadata Profiling.

Example of White Rabbit 'location' screen option

Figure 11: Example of White Rabbit ‘Location’ Screen Option

1.1 Setup White Rabbit (Second Part)

  • Scan Screen:

    • Click on the ‘Scan’ tab.
    • Click ‘Add’, to add the required dataset .csv files.
    • The ‘Min Cell Count’ is set to 5 by default, this can be altered according to the data owner’s requirements.
    • Press ‘Scan Tables’ to run WhiteRabbit.
    • This will produce a ‘Scan Report’ for the dataset metadata within the Working Directory.
  • For Databases

Example of White Rabbit's 'Scan' screen option.

Figure 12: Example of White Rabbit’s ‘Scan’ Screen Option

Checking Scan Report

Examine Scan Report

  • Open the WhiteRabbit Scan Report Excel file from the Working Directory.
  • Check:
    • A sheet has been created for each .csv file added to WhiteRabbit.
    • Check the name of each sheet tab and ensure it is the same as the .csv file name it represents.
    • Check Field Overview sheet results are correct.

Check Anonymisation

  • Check all Direct Identifier data values are not present within the Scan Report.
  • Check all Indirect Identifier data values are not present within the Scan Report.

See Personally Identifiable Information for Direct and Indirect Identifier information.

Checking Scan report in metadata profiling

Figure 13: Checking Scan Report in Metadata Profiling.

Example of WhiteRabbit Scan Report - Aspects to Check

Figure 14: Example of WhiteRabbit Scan Report - Aspects to Check.

Stage 3: Metadata Mapping

Upload to Carrot Scan Report

Upload Scan Report

  • Log into Carrot:

  • Upload Scan Report:

    • Click Scan Reports Tab.
    • Click New Scan Report Upload option.
    • Choose Data Partner - from drop-down list.
    • Choose Dataset - from drop-down list.
    • Choose Visibility: Public or Restricted
      • Public = All registered users of Carrot can view the scan report.
      • Restricted = Only defined/specific registered users of CARROT can view the scan report.
  • Define Editors (users allowed to edit the dataset)

  • Define Viewers (users allowed to view a ‘restricted’ dataset)

  • Create the Scan Report Name.

  • Choose WhiteRabbit ScanReport file location for upload.

  • Choose Data Dictionary file location for upload.

  • Check all items entered are correct.

  • Click ‘Submit’ button to upload the Scan Report.

Upload mapping in metadata mapping

Figure 15: Upload Mapping in Metadata Mapping.

Example of CARROT software tool screens for New Scan Report Upload

Figure 16: Example of CARROT Software Tool Screens for New Scan Report Upload.

Check the Scan Report Upload

While logged into the Carrot tool:

  • Click Scan Reports.
  • Select Scan Reports tab.
  • Check the progress of your Scan Report upload – it will show one of the following three (see diagram):
    • Upload Complete
    • Upload In Progress
    • Upload Failed
  • Refresh the web browser to check on upload progress.
Upload to CARROT in metadata mapping

Figure 17: Upload to Carrot in Metadata Mapping.

Example of CARROT tool Scan Report Status page

Figure 18: Example of Carrot Tool Scan Report Status Page

Map Rules

Choose Dataset

  • Log into Carrot:

  • Click Datasets Tab.

  • Click on the Dataset ID or Name.

  • Click on the Dataset ID, Data Partner or Name.

  • You will then be presented with a list of metadata tables.

  • Before you map rules, you must set the Person ID and Date Event for each table(see diagram below):
    • Click ‘Edit Table’
    • Select Person ID to map to for the Table.
    • Select Date Event to map to for the Table.
    • Click ‘Update’ Table-Name.csv.
  • Now the system is ready to map rules!

Enter Rules

  • Choose the required table & click.

  • You will then be shown the data attributes for that table.

  • There are two levels at which rules can be mapped to data attributes:

    (a) For all values per data attribute:

    • Enter the OMOP Concept ID in the box.
    • Press ‘ADD’
    • This will then map the OMOP Concept ID to all of the values for that individual data attribute.

    (b) For individual values per data attribute:

    • Click on the data variable to enter the set of values.
    • Enter the OMOP Concept ID in the box for each individual value as needed.
    • Press ‘ADD’
Upload mapping rules in metadata mapping

Figure 19: Upload Mapping Rules in Metadata Mapping.

Setting Person ID and Date Event for each Dataset Metadata Table

Figure 20: Setting Person ID and Date Event for Each Dataset Metadata Table.

Check Map Rules

Choose Dataset

  • Log into Carrot:
  • Click Datasets Tab.
  • Click on the Dataset ID or Name.
  • Click on the Dataset ID, Data Partner or Name.
  • Click on ‘RULES’ button.
  • There are the following options (see diagram below):
    • Download Mapping JSON
    • View Map Diagram
    • Download Map Diagram
    • Download Mapping CSV
    • Show Summary View
    • Analyse Rules
  • Check your mapped ruleset using one of the above options.

Export Mapping Ruleset:

  • Click ‘Download Mapping JSON’
  • The JSON file will then be exported from CARROT and downloaded to your system.
Check mapping rules in metadata mapping

Figure 21: Check Mapping Rules in Metadata Mapping.

Example of Dataset Mapping Rule options

Figure 22: Example of Dataset Mapping Rule Options.

Reference

Bibliography